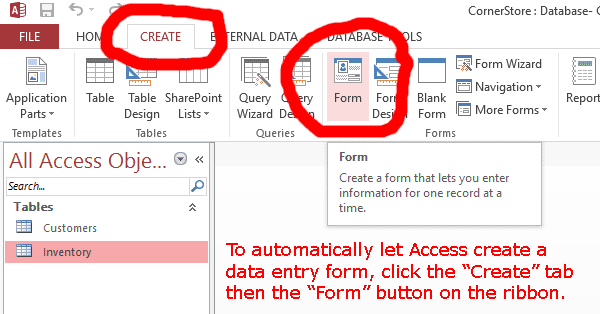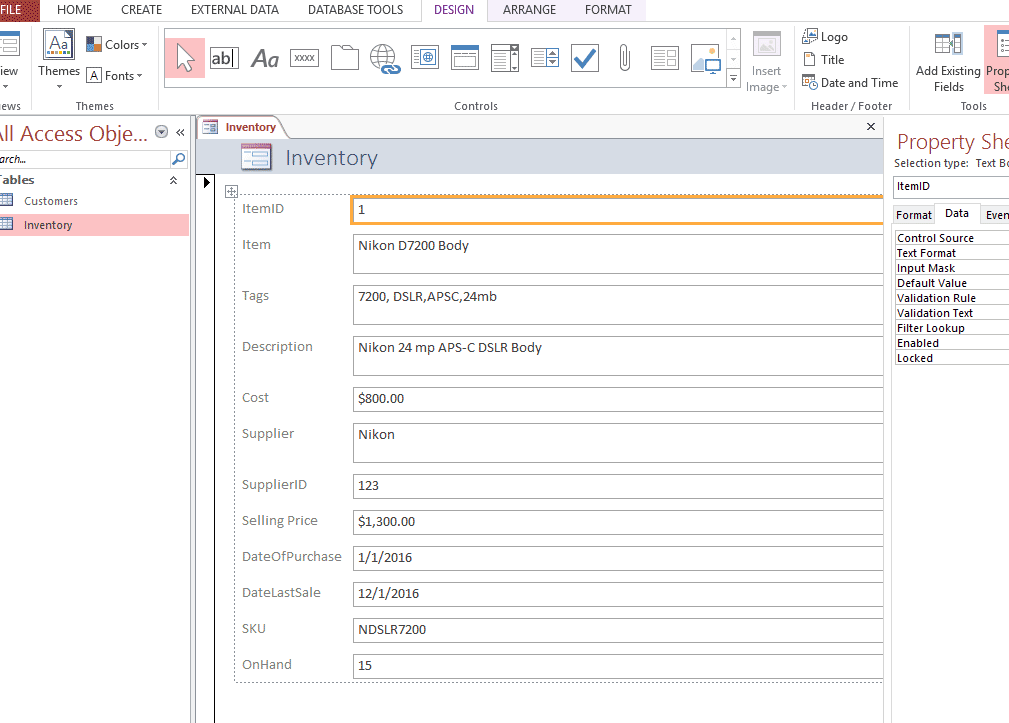
Click on the "Inventory" table listing in the left panel to highlight the name. Then click the "Create" Tab and on the ribbon for that tab click the "Form" button. This automatically generates a plain-Jane but servicable data entry form. (see below)


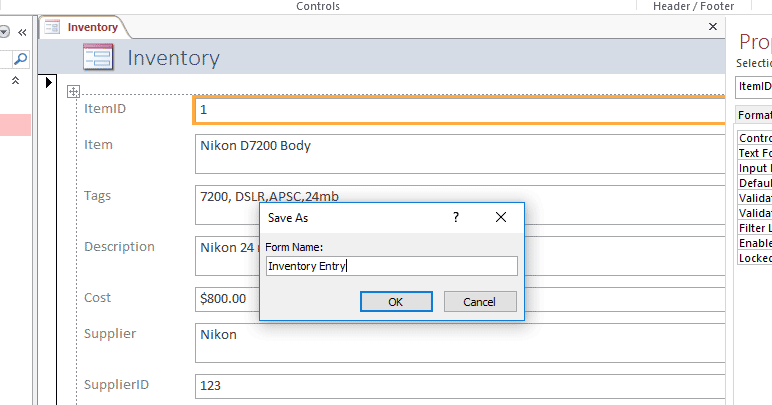
Hit Control-S to save or simply close the new form by clicking on the "X" in the upper right to get a save or don't save dialog. Answer "save" and you will get this "Save As" window. Enter the name for your form, in this case we are using "Inventory Entry" then click the "OK" button.
You now have a data entry form to make it easier to enter all the information for one record at a time.


Part 2 - A Report (from a Query, see above)
What you should take out of this exercise:
- A report is what we used to call a print out, a paper (or PDF now) document
- Normally we start with a query in order to print that answer to a question
- You will work with this to format it for use on paper
- Do print this out for yourself (don't turn it in) to check your formatting


Here we've clicked on the double chevron button to put all the fields previously listed on the left side, on the right side for Selected Fields.
Take the rest of the defaults to finish and display the report.

Part 3 - Extra Credit - Relationship and Report
What you can be expected to take away from this.
- Relationships are the heart and soul of multi-table databases
- Relationships are created by connecting a field in one table with the same information in a field in another table
- Once a relationship is created you can create queries on the related tables with field from both tables
- This will show all records from one table which are connected to (related to) another table
- The method we are using here, for the exercise, is not workable for a store, but serves to illustrate the method
- WARNING!! This is not the way you would set up a relationship to find out who bought what.
- This is ONLY an lesson example, so don't copy this as is for real-world use
- This hands-on exercise does, however, illustrate the method, so it is used here for extra credits
- In the real world we would have at least three other tables:
- an Employee table to list employee and provide a way to relate each sales person to an invoice
- This allows you to keep track of each person's sales totals
- an Invoice table to keep track of each purchase
- Each invoice is an anchor point for the items being purchased (line items_
- Each invoice contains other information such as sales person and customer ID numbers
- an InvoiceDetails table to add purchased items to the invoice.
- Each of these line items are related to the Invoice by the invoice ID number
- Each line item record can also have a customer ID number though you can get this via the Invoice
- an Employee table to list employee and provide a way to relate each sales person to an invoice
If this were a real-world simulation we could break down a typical store invoice this way.

Notice how all the individual items listed on the invoice are tied to the invoice itself by including the invoice number in a correspoding "invoiceNumber" field in each line item (InvoceDetails table). The tie is a relationship. There are several table which are related here:
The Invoice Table record is the main record. It contains the employee ID of the sales person and the customer ID of the customer. In turn, each line item contains the record ID (invoice number) of the invoice.
In turn each line item recorded has the record number of the record in the inventory table which contains the original record about each item sold. But by itself the inventory table does not contain a field for the custormer who buys the item. That would not make sense. Instead that is kept in the invoice record which links to line items on the sales slip.
Because this is not a database course and because this is merely one assignment out of a number of assignments in a very introductory course we are going to "cheat" by directly relating some inventory items to some customer records. I REPEAT. This is ONLY to setup a relationship extra point assignment without having you make up a set of additional tables and filling them in. We do have a database course where we go through all the right steps but this is not it. Still, the whole point of a relational database is that we can relate one table to another (or to several) in order to ask more complicated questions than those we can answer with a simple card-file type database.
SO, HAVING WARNED YOU we are now going to slightly modify the inventory table in order to set up a relationship, for extra points, if you wish. This is ONLY to get a little bit of practice in setting relationships.
Defining A Relationship - (extra points)
Modify Table Structure

We will start our exercise by adding a field to our "Inventory" field. We will use the field to relate inventory items to customers.
- So, right-click on the "Inventory" table in the left-hand panel
- Then pick the "Design View" option because we are going to modify the table.

- Now, at the end of the field names add one more field, "CustomerID"
- make it a number field
- modify the new field's properties to "Long Integer"
- Note: We are using the long integer number type because that will hold large-number IDs
- Save the changes
- change to spreadsheet (row and column) view

At this point we need to enter some numbers which will allow us to link up (relate) items in the inventory table with customers. Our customers have Customer Numbers from 1 through 5 (remember, this is just a school illustration).
So, in the Inventory table's CustomerID column, type in numbers all the way down from 1 through 5. The number and order and number of each number is not important. This is just an example. Merely make sure you use all 5 numbers, at least once each. Don't use any other numbers otherwise the items won't show because they won't match the customer numbers. Later, as an experiment, you might want to enter some non-existent customer number and run the query we are going to make, just to see for yourself. It is always better to do your own playing with the program if you want to understand it.
Create the Relationship - Define it for the database

With our matching data items entered it is time to click on the "DATABASE TOOLS" tab and then the "Relationships" button.

Now you have a list of tables in the "Show Table" dialog. Highlight "Customers" table and click the "Add" button. Do the same for the "Inventory" table. This will put a pair of table field list windows on screen. Click the "Close" button.

FINALLY, we are ready to describe the relationship to our database.
- Place your cursor in the left-hand list over the "Customer Number" field and click down on the mouse button.
- Hold it down and drag the mouse to the right-hand panel at the bottom where it says "CustomerID" and
- let up the mouse button.
- Until now you didn't really see anything.
- When you let up the button at this point you will see the line drawn between the two fields.
This is the relationship. There is nothing more to do for this. Now it is time to use the relationship in a query (storable, reusable question)
Make a Query Based on the Related Tables

Time to make our new query using the related tables.
- Go to the "CREATE" tab
- Click on the "Query Wizard"
- On the "Tables/Queries" pull down list box choose "Customers" table
- Pick out the fields you want to see.
- Here I've picked three fields from Customers: Customer Number, First Name and Last Name

On the "Tables/Queries" pull down list box choose "Customers" table

On the "Tables/Queries" pull down list box choose "Customers" table
- Again, pick the fields you want to see
- I've picked ItemID, Item, Cost and CustomerID

- So now you can see the full selection of fields from the two related tables
- I've grouped them by table using red brackets
- I've pointed to the two fields with a two-headed arrow, one in each table, which establish the relationship.
- Click the "Finish" button.
- See below.
Run Your Query

This is pretty much what your relationship query should look like. Depending on which records you gave with customer number to, it will vary somewhat from this, but will still work the same way.